Friday, March 29, 2013

Make Your Own Wire Flowers

The other day, I showed off the mail holder that we made from a shutter. 
I had placed some wire flowers in the shutter for decoration and now I'd like to tell you more about how I made those. 

Start with a roll of lower gauge wire. I'm not sure what thickness this is because  I've had it sitting around my house for awhile and don't remember (I apologize).
But it's easily shaped, yet strong enough to hold its form. 
Start by making a petal shape and looping the end around where it meets the wire again to secure it.  
 
Next you can make your second loop. It really doesn't matter which direction you make the loop, because you can fill the petals in around any side of the flower very easily.  
Simply bend the wire around the middle each time you make a petal to form your flower. Again, it's pretty tough to make a mistake because you can bend and fold the wire any way  you need to in order to fill in your flower petals. 
You will end up having something that looks like this.  
In order to finish the flower and hide the imperfections of the middle where all of the wires are folded around each other, I did one of two things. For the flower on the left, I used an embroidery needle and thread, made a very large knot in the end, and sewed the thread up and through various loops in the wire and called it good. For the flower on the right, I did the same thing, but then used a sewing needle (because the embroidery needle was too large for the button holes) to add the button on.
The really nice part about making flowers in this fashion, is that you really can't mess them up! 
And I just love them! And I like that I can coordinate them with any project or decor just by switching up the color in the middle!

Hope you enjoyed seeing more about these wire flowers.
And if you like these, you might also enjoy learning more about our felt and burlap flowers.
Check out that post here.

Click here to see the cute project we made with these flowers!

If you haven't liked our facebook page yet, you can do that here.
And you can follow me on Pinterest with this link.
To get my new posts at bloglovin', just click this.

Most of all, have a great day!

Thursday, March 28, 2013

A Crafty Spring Bouquet

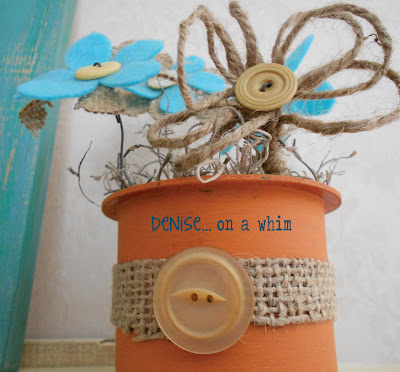
Today I want to tell you how I made these pretty little felt and burlap flowers. 

I'm not always the best flower maker. I've tried some different flower tutorials and had varying success. Sometimes I see diy flowers and they are so, so pretty so I try my hand at them and they end up not resembling a flower at all! 

The best luck I've had with flowers until now were the flowers I made for our Live Simply Shutter project, which you can find here.
First, let me tell you a little about the vases I made for this project. These are actually plastic pieces that come in the ends of our vinyl tubes at work. We throw them out all the time. Awhile ago, I brought some home, because I just knew there must be someway to repurpose them. It just took me awhile to figure out how! 

For this project, I simple painted them with chalk paint. One is Annie Sloan Barcelona Orange and the other is Ce Ce Caldwell Santa Fe Turquoise. Then I just added a piece of scrap burlap and an old button to each with some gorilla glue and clamps. 

Next thing to do was make the flowers.
It was very easy, believe me. I cut some burlap and some felt in the shapes of daisy petals. Just free-handed it because they don't need to be perfect by any means. The only thing you need to be aware of, is leaving enough burlap left in the middle of the flower so that it won't end up falling apart. Since it's burlap, it will fringe off and if you don't have enough fabric intact in the middle, you might loose a petal or two! 

After everything was cut out, I picked out my buttons and then simply took some lower gauge wire that I had on hand, cut it long enough for a stem and poked it up through the burlap, felt and button hole. I then bent it, poked it back down through the 2nd button hole and through the material until it was far enough so that I could twist the 2 wires together underneath the flower. Before you twist, just give each side a little tug so the wire is tight against the button on the top of the flower. 

The best thing about adding the button, is that it hides any flaws you might have in the shape of your flower. All you can see are the petals, so if you cut a strange shaped flower that looks all wrong to you, don't throw it away. Chances are, it will look perfect when everything is together!
And then you're done! I put a little spanish moss into my upcycled vases and added my flowers. 

I love them! They are one of my favorite things to look at in the house right now :)

Later this week I will share a tutorial with you on how to make the wire flowers I used for decoration on our repurposed mail holder shutter. Those are super easy too!

If you haven't liked our facebook page yet, you can do that here.
And you can follow me on Pinterest with this link.
To get my new posts at bloglovin', just click this.

Most of all, have a great day!

Wednesday, March 27, 2013

Make a Wish (wall hook)

Here is another one of the little pretties we debuted with our repurposed shutters the other day.

A cute little pallet board hook for the wall. 
This project was easy as pie (which sometimes isn't really all that easy, depending on the pie. lol)

I found some pallet wood pieces in Eric's scrap bin last week. I picked some that were just about the same length and I glued and nailed them onto a vertical 4th piece of scrap wood on the back.

I love pallet wood because it always has nail or staple holes, gouges and miscellaneous flaws.
It's always so perfectly imperfect!
Once everything had dried, I simply painted on some Annie Sloan Barcelona Orange, then a little Ce Ce Caldwell's Johnston Daffodil and finally some Santa Fe Turquoise. I didn't distress a thing, just painted it quickly, hitting and missing wherever I felt like it. 

I just happened to have a few stencil letters that I cut apart and placed randomly and a little crookedly onto the board. Then used Aubusson Blue for the lettering. 

I used Barcelona Orange again on a double-hook I had lying around in my pieces/parts box. 

Finally I added clear wax to everything, then attached the hook under the lettering (and dabbed some paint on the screw heads too) and a little twine hanger off the back.
This little board matches our new shelf perfectly. 

Can you tell by my color choices lately that I am SO ready for spring? :)

(pssst.... I'm going to tell you more about those cute metal and felt flowers and the little repurposed vases later this week, so be sure to stop back by!)

If you haven't liked our facebook page yet, you can do that here.
And you can follow me on Pinterest with this link.
To get my new posts at bloglovin', just click this.

Have a great day!

Tuesday, March 26, 2013

A Chalkboard in Bloom

Today I wanted to tell you a little bit more about our spring chalkboard that was hanging next to our new mail holder made from a shutter that I shared yesterday. 

This little goodie was already a chalkboard. But, the surface was pretty much shot. You just couldn't write on it anymore.

We had this particular item donated to us by a woman who saw us at our very first show and loved our stuff. She just so happened to have a few things in her car that she was planning on taking to Goodwill that day. Instead, she brought them back to our booth and made a donation to On A Whim! 
People can be so nice :)
All I did for this piece was paint the chalkboard itself with Ce Ce Caldwell's Emerald Isle and then I used Annie Sloan Aubusson Blue on the frame and dry brushed some Ce Ce's Santa Fe Turquoise over that. I love the effect! 

I printed some letters off of my computer and cut around them. I then cut 3" x 3" squares out of some springy-green scrapbook paper I had and made them into triangles. I glued the letters onto those and I attached the flags to a piece of teal yarn I had picked up somewhere in a free bin with some blue flower brads I had laying around in my scrapbook stash.
I just love the combination of blue and green, don't you? :)

Monday, March 25, 2013

1 Shutter, 2 Ways!

I'm so excited to show off our shutters today!

We picked this pair of shutters up last summer at my favorite barn sale near Nashville, MI. 
 And they've been sitting in my garage ever since...
 Guess I just needed the right inspiration for them.
I think Spring was exactly what I needed to get my mind working on what to make out of them. 
(Or at least the thought of spring, since it's still only in the teens here today!)
 For one, Eric made a pocket and attached it to the front. It's now a super cute mail holder. :)

I painted it with Ce Ce Caldwell's Johnston Daffodil and Santa Fe Turquoise. A little dry brushing, distressing and some wax (along with a few painted hooks for keys), and she's all set for Spring!
 I added a few wire flowers for extra cuteness :)

And this is the 2nd shutter...
 She's now a shabby shelf.
 Eric simply cut a pallet board for the top. I found the little brackets at a local store here called Flat River Cottage. I painted everything in Cottonwood Sienna and then roughly brushed on Johnston Daffodil over that and  added some clear wax. 

Then I, (yes I), attached all the pieces together and, voila!
A small shelf  just perfect for brightening up a wall!
 I made the rest of these little lovelies to go with it. I'll tell you more about those later this week. 
Now I can enjoy the impending spring (it will indeed come eventually, right?) inside my house, despite the weather! 


Next up... some spring cleaning! lol

If you like the crafty little decor displayed with our shutters, you should check out these posts too...
A Chalkboard in Bloom
Make a Wish (wall hook)
A Crafty Spring Bouquet
And on Friday you can learn how to make pretty wire flowers!
See how pretty they are on a piece of picket fence!

Partying here...
Spring Fling Linky Party with Flamingo Toes and Homework
Spring and Easter Categorically Crafting Show at Someday Crafts
Marvelous Mondays at Top This by Leanne


One Project at a Time at A Bowl Full of LemonsTransformation Tuesday at The Ironstone NestMonday Funday at Creatively LivingNifty Thrifty Tuesday at Coastal CharmThe Scoop at Cedar Hill RanchProject Inspired{d}at Cupcakes and CrinolineYou're Gonna Love It at Kathe with an ETransformed Tuesdays at PJH DesignsTweak It Tuesday at Cozy Little HouseTake a Look Tuesday at Sugar Bee CraftsPrimp Your Stuff Wednesday at Primp JunktionBe Inspired at Elizabeth and CoPretty Things Link Party at twelveOeightTime to Shine at A Diamond in the StuffToo Cute Tuesday at Funky Polkadot GiraffeThe Power of Paint Party at Domestically SpeakingCreatively Tuesday at The Rustic PigShow Me What You Got at Not Just a HousewifeShare It Link Party at The Winthrop ChroniclesTasteful Tuesday at Naptime CreationsTutorial Tuesday at Hope StudiosTrash 2 Treasure at Kammy's KornerFluster's Creative Muster Party at Fluster BusterThe Creative Spark at Clean and ScentsibleTuesdays at Our Home Party at Our Home Away from Home

Simply Creations Link Party at My Simple HomelifeFurniture Feature Friday at Miss Mustard SeedInspire Me Please Link Party at Liz Marie BlogFrugal Friday at The Shabby NestFeathered Nest Friday at French Country CottageWhat Have You Redone at Redoux InteriorsHome Sweet Home at The Charm of HomeThrifty Things Friday at The Thrifty GrooveSimple and Sweet Fridays at Rooted inThymeBe Inspired at Common GroundFaunt It Friday at Chic on a Shoestring DecoratingFrugalicious Friday at Finding FabulousFabulously Creative Friday at Jennifer RizzoShow and Tell Friday at Romantic HomeJunkin' Joe Vintage and Thrifty Finds at The Cottage MarketWeekend Wrap-Up Party at Tatertots and JelloShabbilicious Friday Link Party at Shabby Art BoutiqueTickled Pink at 504 MainAnything Blue Friday at The Dedicated House

Wednesday, March 20, 2013

Faded Denim End Table Redo

This is our latest furniture makeover. I'm calling it Faded Denim because that's what the colors and dry-brushing effect reminds me of... a comfy pair of blue jeans. :)

I picked up this little beauty at our local thrift store for only $6. It was originally $12 but I just so happened to be there on 1/2 price day. Lucky me!

Here is the table before any paint. The table was very sturdy, but I did sand the tops down because there were various scratches and dents in them and I thought a complete sand-down of those areas would be good for this project. 
And here she is after a coat of both colors. 
I used Smokey Mountain, which is the lighter color,  and Aubusson Blue. Smokey Mountain is a Ce Ce Caldewell's greyish-blue color that I really liked against the Aubusson.
I had originally decided to paint this with Old White and Smokey Mountain. This was my first time using Smokey Mountain, though, and once I got it on, I couldn't help but change my mind about the Old White and use Aubusson instead. It's one of my favorite colors and I knew I would love these 2 together! 
I painted Aubusson under the Smokey Mountain and vice-versa on some areas. I also dry brushed the Smokey over the Aubusson. I really like how that turned out.  
I had intended on using Aubusson in the grooves only. But I decided to paint the entire insets on the top, around the backs of the legs and the underside of the table too. 

(Pay no attention to the upside down no. 5 in the background there. The kids' bookcase is over that way!)
I distressed some of the Smokey Mountain off to reveal the Aubusson and then added more distressing all over to let the wood show through a bit. 
I think she'll make a very nice vintage side table for someone's home. :)

Everyone loves a good party!
Check my project out along with other great inspiration, at these great blogs...

One Project at a Time at A Bowl Full of LemonsTransformation Tuesday at The Ironstone NestMonday Funday at Creatively LivingNifty Thrifty Tuesday at Coastal CharmThe Scoop at Cedar Hill RanchProject Inspired{d}at Cupcakes and CrinolineYou're Gonna Love It at Kathe with an ETransformed Tuesdays at PJH DesignsTweak It Tuesday at Cozy Little HouseTake a Look Tuesday at Sugar Bee CraftsPrimp Your Stuff Wednesday at Primp JunktionBe Inspired at Elizabeth and CoPretty Things Link Party at twelveOeightTime to Shine at A Diamond in the StuffToo Cute Tuesday at Funky Polkadot GiraffeThe Power of Paint Party at Domestically SpeakingCreatively Tuesday at The Rustic PigShow Me What You Got at Not Just a HousewifeShare It Link Party at The Winthrop ChroniclesTasteful Tuesday at Naptime CreationsTutorial Tuesday at Hope StudiosTrash 2 Treasure at Kammy's KornerFluster's Creative Muster Party at Fluster BusterThe Creative Spark at Clean and Scentsible

Simply Creations Link Party at My Simple HomelifeFurniture Feature Friday at Miss Mustard SeedInspire Me Please Link Party at Liz Marie BlogFrugal Friday at The Shabby NestFeathered Nest Friday at French Country CottageWhat Have You Redone at Redoux InteriorsHome Sweet Home at The Charm of HomeThrifty Things Friday at The Thrifty GrooveSimple and Sweet Fridays at Rooted inThymeBe Inspired at Common GroundFaunt It Friday at Chic on a Shoestring DecoratingFrugalicious Friday at Finding FabulousFabulously Creative Friday at Jennifer RizzoShow and Tell Friday at Romantic HomeJunkin' Joe Vintage and Thrifty Finds at The Cottage MarketWeekend Wrap-Up Party at Tatertots and JelloShabbilicious Friday Link Party at Shabby Art BoutiqueTickled Pink at 504 MainAnything Blue Friday at The Dedicated House

Saturday, March 16, 2013

Farm Fresh Eggs

My friend Jessica gave me some fresh eggs the other day. 

It's hard to see in this picture, but all except one had those pretty pale blue shells. 
She laughed when I said I was going to make a nest and take some pictures of my pretty blue eggs.

But I just couldn't help myself... :)

It's Easter time, after all. It's the season of the egg! 
When I was arranging them in their nest (a terra cotta pot base with some CeCe Caldwell's Destin Gulf Green over Emerald Isle Green), I placed the one brown egg in the center and it looked like a daisy. 
So I kept it that way and took a few pictures.

My little egg arrangement made me smile.
Maybe it's made you a smile a little too. Hope so! :)

Thursday, March 14, 2013

Barn Wood Hook Board

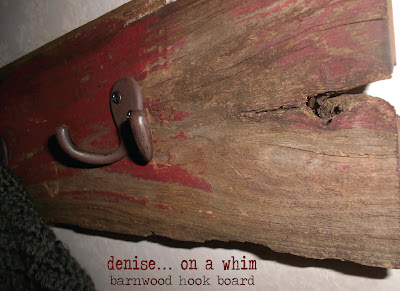
The other day I showed you the leaded glass window shelf we made for my friend Karlye. Well, she also wanted some hooks to hang below a piece of decor she had already purchased for her home. She requested barn wood for the hook board. And she was in luck! I just happened to have a few pieces in my garage waiting to be plucked and turned into something fabulous!

She chose this piece with the chippy red paint. Love her choice!
Eric cut the board to the correct size, just a little wider than the piece of decor she wanted to put this under. I made sure to mark where I wanted him to make the cuts so we could keep intact the cool uneven part you see on the left hand side of this pic...
Not to mention, how cool is this old knot on the other side? 
I added some dark stain to the edges where Eric had made the cut. The board was old enough that it was looking slightly worn all the way through, but I thought the stain would make anyone forget that we had made the cut at all. It did the trick! 

Karlye had also given me these double hooks for the board. But she had purchased them new at the store and they looked, well, brand-spanking new! I used some Ce Ce Caldwell's Virginia Chestnut on those to grunge them up a bit and then I waxed them and attached 5 hooks to the board, offsetting them so they weren't all in a straight line. 
I love how this turned out! Just as much as I love the window shelf we made for her. I think that the next time Karlye asks me to make something, I'm just going to have to make 2 of them and keep one for myself! :)

Everyone loves a good party!
Check my project out along with other great inspiration, at these great blogs...

One Project at a Time at A Bowl Full of LemonsTransformation Tuesday at The Ironstone NestMonday Funday at Creatively LivingNifty Thrifty Tuesday at Coastal CharmThe Scoop at Cedar Hill RanchProject Inspired{d}at Cupcakes and CrinolineYou're Gonna Love It at Kathe with an ETransformed Tuesdays at PJH DesignsTweak It Tuesday at Cozy Little HouseTake a Look Tuesday at Sugar Bee CraftsPrimp Your Stuff Wednesday at Primp JunktionBe Inspired at Elizabeth and CoPretty Things Link Party at twelveOeightTime to Shine at A Diamond in the StuffToo Cute Tuesday at Funky Polkadot GiraffeThe Power of Paint Party at Domestically SpeakingCreatively Tuesday at The Rustic PigShow Me What You Got at Not Just a HousewifeShare It Link Party at The Winthrop ChroniclesTasteful Tuesday at Naptime CreationsTutorial Tuesday at Hope StudiosTrash 2 Treasure at Kammy's KornerFluster's Creative Muster Party at Fluster BusterUpcycled Link Party at Love 2 Upcycle

Simply Creations Link Party at My Simple HomelifeFurniture Feature Friday at Miss Mustard SeedInspire Me Please Link Party at Liz Marie BlogFrugal Friday at The Shabby NestFeathered Nest Friday at French Country CottageWhat Have You Redone at Redoux InteriorsHome Sweet Home at The Charm of HomeThrifty Things Friday at The Thrifty GrooveSimple and Sweet Fridays at Rooted inThymeBe Inspired at Common GroundFaunt It Friday at Chic on a Shoestring DecoratingFrugalicious Friday at Finding FabulousFabulously Creative Friday at Jennifer RizzoShow and Tell Friday at Romantic HomeJunkin' Joe Vintage and Thrifty Finds at The Cottage MarketWeekend Wrap-Up Party at Tatertots and JelloShabbilicious Friday Link Party at Shabby Art BoutiqueTickled Pink at 504 Main

Tuesday, March 12, 2013

Leaded Glass Window Shelf

 My friend Karlye brought me this window when she came to pick up her vintage desk a short time ago. She had purchased the window in November and wanted to make a shelf out of it. I thought that sounded like an excellent plan! So we picked colors out and I went to work.

I had Eric cut the shelf and then he attached it for me. The window had previously been painted a few different colors. Purple was even under there somewhere! So I set to work with some Duck Egg. Then painted over that with Graphite. Distressed it. Waxed it with dark aging wax. 

 Added some dark grey pulls I had lying around to pretty it up a bit. 
And it was done!

(Except for hanging it on MY wall and staging it a bit for pictures. I finally got that done last night. And then promptly took it down so I wouldn't tempted to pay her for the window and keep it!)
I love the Graphite with the leaded glass. I think it looks very classy. 

Hope she loves it too!  

Everyone loves a good party!
Check my project out along with other fantastic inspiration, at these great blogs...

One Project at a Time at A Bowl Full of LemonsTransformation Tuesday at The Ironstone NestMonday Funday at Creatively LivingNifty Thrifty Tuesday at Coastal CharmThe Scoop at Cedar Hill RanchProject Inspired{d}at Cupcakes and CrinolineYou're Gonna Love It at Kathe with an ETransformed Tuesdays at PJH DesignsTweak It Tuesday at Cozy Little HouseTake a Look Tuesday at Sugar Bee CraftsPrimp Your Stuff Wednesday at Primp JunktionBe Inspired at Elizabeth and CoPretty Things Link Party at twelveOeightTime to Shine at A Diamond in the StuffToo Cute Tuesday at Funky Polkadot GiraffeThe Power of Paint Party at Domestically SpeakingCreatively Tuesday at The Rustic PigShow Me What You Got at Not Just a HousewifeShare It Link Party at The Winthrop ChroniclesTasteful Tuesday at Naptime CreationsTutorial Tuesday at Hope StudiosTrash 2 Treasure at Kammy's KornerFluster's Creative Muster Party at Fluster Buster


Simply Creations Link Party at My Simple HomelifeFurniture Feature Friday at Miss Mustard SeedInspire Me Please Link Party at Liz Marie BlogFrugal Friday at The Shabby NestFeathered Nest Friday at French Country CottageWhat Have You Redone at Redoux InteriorsHome Sweet Home at The Charm of HomeThrifty Things Friday at The Thrifty GrooveSimple and Sweet Fridays at Rooted inThymeBe Inspired at Common GroundFaunt It Friday at Chic on a Shoestring DecoratingFrugalicious Friday at Finding FabulousFabulously Creative Friday at Jennifer RizzoShow and Tell Friday at Romantic HomeJunkin' Joe Vintage and Thrifty Finds at The Cottage MarketWeekend Wrap-Up Party at Tatertots and JelloShabbilicious Friday Link Party at Shabby Art BoutiqueTickled Pink at 504 Main


Pin It button on image hover